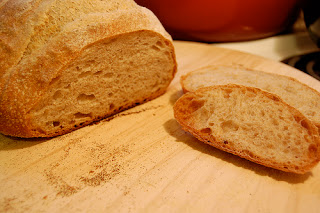
I love it when people come for supper because it causes me to make things that I don't usually make but I really like making. Bread and bread products are probably my favourite thing to make but also are the least made in my house. Why you ask? For the simple fact that I would eat all of it. I love making bread because its so warm and it just begs you to put your hands in it and knead it. Needless to say I had company tonight hence the inspiration for French bread.
French Bread
Ingredients
2 C warm water
1 tbsp yeast
1 tbsp olive oil
1 tbsp sugar
2 tsp salt
5-5 1/2 C bread flour
Directions
In a large bowl dissolve yeast and sugar in warm water, allow the yeast to proof, this should take no longer than 5 minutes or else your yeast is too old or your water was too hot. Add salt, oil, 3 cups of flour mix it all together. Stir in the other 2 cups flour to make a stiff dough. Knead until smooth and elastic approximately 10 minutes. Place in an oiled bowl, turn the dough to coat all the sides, cover and let rise until doubled. Punch the dough back and divide in half, shape the dough into 2 slender loaves. Place loaves on a long cookie sheet, cut diagonal gashes on the top of each loaf, cover and let rise til doubled. Bake at 375 for about 30-35 minutes (when you knock on the bottom of them they should sound hollow and be a golden brown)
*You can sprinkle or spray your loaves with water while they're baking to get a very crunchy crust*
Saturday, March 9, 2013
Sunday, March 3, 2013
Oven Rice
In our family, comfort food was more associated with oven rice over mac n cheese and today was so disgusting out that I had make it for supper. Much to my dismay I found I could not because I don't have onion soup mix. Don't worry your pretty little hearts though because I was talking to my sister and she told me to put in coconut milk and spices instead. I am very pleased to say that this version is almost just as excellent as the original. So thank you Sara for making my supper delicious.
Oven Rice
2 c uncooked rice
1 can coconut milk
1-2 c water
1/4 c Bragg or soy sauce
Spoonful of coconut oil or 3 tbsp olive oil
2 tbsp beef stock
1tbsp pepper
A few shakes of cayenne pepper
1 small onion diced small
1 c chopped mushrooms
Put the rice in an oven safe container that you can cover. Measure out the coconut milk from the can and add enough water so that the total liquid between water and coconut milk is 3 cups, pour over the rice along with everything else, stir the rice well so that there is no dry patches and cover. Cook at 350 for 60-65 minutes until there is no liquid left you can also uncover and brown the rice for the last few minutes if you like your rice a bit crispy. Play with this recipe yourself and let me know how yours turns out.
Wednesday, February 27, 2013
Fake and Bake Chicken
It would appear that I haven't been following through on my promise. Hopefully it can be forgiven when you see the what I had for supper. Tonight I was going for ease and little to no prep work. I had broccoli with garlic and Bragg (it's recipe is the post call vibrant greens) steamed carrots with dill, cucumber, tomato and fake and bake chicken. Really the only recipe I can give you is the fake and bake chicken so here it is.
Fake and Bake Chicken
6 fresh chicken drumsticks
3/4 c spelt or wheat flour
1 tsp pepper
1 tsp seasoning salt or salt
1/2 tsp chili flakes
1/4 tsp turmeric
1/2 tsp cayenne pepper
Egg wash
2 eggs
1tbsp sriracha
1/2 tbsp honey
Mix the flour and spices in a bowl and mix the egg wash ingredients in another bowl. Dip the drumsticks in the egg wash then roll them in the flour, back into the egg wash and flour again for a second coat. It may seem like you have too much flour mixture but I like you have too much then to have to make more in the middle of making this. Lay the drumsticks on a parchment lined baking sheet and cook at 375 for 35-45 minutes or until done and golden brown.
Tuesday, February 5, 2013
Macaroni and Cheese
Tonight my sister wanted me to kick it old school with some mac and cheese and so i obligingly said yes. This meal may not be too high on the health meter but it definitely lives up to your childhood memories of the perfect meal. I got this recipe off the website fortheloveofthesouth.com I would highly recommend checking them out, they have some good recipes, you should also check out food 52. Right now on food 52 cookbooks are going head to head in a heated battle called the piglet, if you want to check that out it is fun for the cookbook lovers. Also if you are in the foodie niche you may recognize some big names on the judging panel, so what I'm trying to say is, a. the 16 cookbooks that made it onto the list are really good ones and b. the cookbook that brings home the bacon (wins the piglet) is a must buy and no I do not work for or am affiliated in any way to food 52, I just really enjoy their blog. Anyway I have blathered on quite enough so here is the recipe, keep in mind that I did alter the recipe to suit my fancy and if you want the original recipe you will have to go to fortheloveofthesouth.com
Mac and Cheese
3/4 of a pound of rice pasta shells (you could use any type of pasta, wheat, spelt...)
4 tbsp Butter
4 tbsp Spelt Flour (you can also use wheat flour)
2 C Almond Milk (you can also use cows, soy or rice milk)
2 C Freshly Grated Cheddar
1 Jalapeno Seeded and Diced
Cook the pasta in salted water (the saltier your water, the better your final pasta will taste so make sure it tastes like the ocean) until it is al dente. Once it is cooked keep 1 cup of pasta water, strain the pasta and keep warm. For the sauce, in a medium saucepan on medium-low heat, melt butter and add flour to pan. Cook for 1 minute to cook out the “flour” taste. Add milk and whisk out any lumps. The mixture will begin to thicken after a few minutes. Season with salt, pepper and cayenne. The sauce should be taken off the heat whenever the sauce can coat the back of a spoon. Take off heat and whisk in the cheese. and the jalapeno Add the pasta with a little bit of pasta water. Mix to combine. Enjoy :)
Monday, February 4, 2013
Vibrant Greens
I know I know, I haven't put a recipe up all weekend but I decided I would make this a Monday to Friday thing since weekends are very unpredictable. Tonight I made a supper that revolved around the fact that I didn't really feel like cooking meat. I made the rice and yogurt dish from last week which was called Just Rice along with sautéed broccoli. The only thing I changed from the rice last week was that I used brown rice instead of white. As for the broccoli the general idea is that I sautéed half a red onion in coconut oil until the onion had just begun to brown and added, 2 cloves of garlic and 2 crowns of broccoli. I sautéed them until the broccoli was a vibrant green. I took the pan off the heat added a sprinkling of bragg, soy sauce could be used instead and that my friends was my supper in a nutshell.
Friday, February 1, 2013
Biscuits and Vegetable Soup
Tonight I made the never ending meal, in our house that is soup. I always end up with way more than what I first intended. Also, there isn't a recipe I can really give you to recreate this soup because soup is probably the least measured thing I make. I just keep adding to it until it tastes right. What I did though was I boiled a package of uncooked sausage and once it was cooked I took it out and saved the water for the base of my broth. In the soup I put one chopped butternut squash, the flesh of 1/2 a pumpkin, 1 onion, 3 cloves of garlic and about 5 chopped beets. I boiled those all together in the sausage water until they were soft enough to blend and blended them. While the soup was boiling I sautéed carrots, celery and an onion. Once the soup was blended i added in my sautéed vegetables, at this point I also added the cooked sausage back into the pot. For seasonings I just used pepper, fresh dill, marjoram, beef stock and celery seed. I put all these in to taste and my soup was made. I served it with a savoury onion dill biscuit, which I have a recipe for.
Biscuit recipe
2 C Spelt Flour
4 tsp Baking Powder
2 tbsp Sugar
1 tsp salt
1/3 C Butter
3/4 C Almond Milk
1 chopped onion, caramelized and cooled
Handful of chopped fresh dill
Mix the first 4 ingredients in a bowl. Cut in the butter until it's crumbly. Add milk and mix it in either with a fork or your hands. Mix in the onion and dill then form the dough into balls, place on a cookie sheet and place in the oven at 425 for 8-10 minutes or until they're risen and browned.
*With spelt flour you still want the dough to be quite moist unlike traditional biscuits where you can cut them, these will only be able to be shaped into balls with your hands. If you get the dough too dry your biscuits will be a bit crumblier than normal. Also if you want to make this with normal milk and wheat flour again you can use the same proportions that I have laid out for the spelt flour and almond milk.
Thursday, January 31, 2013
Just Rice?
Tonight I was at home alone and there was no one for me to cook for so I didn't really feel like cooking. Usually on these nights I would make an egg and be done with it but since I made a promise to give you a supper for 30 days, I decided to put a little effort into it. The credit goes out to my sister for this recipe. This is a super easy, super fast recipe that takes only as long as it takes for rice to cook. It may sound weird at first but please give it the benefit of the doubt because it is possibly the best rice dish ever. That's saying a lot coming from me since rice is my favourite food, if I was on a desert island all I would need is, rice.
Recipe
1 Avocado
2 Roma Tomatoes
1/2 a Cucumber
1 Red Pepper
1/2 a Container of Plain Yogurt
Cilantro
Steamed Rice
Chop all of the vegetables and mix them in a bowl with the yogurt. You want the mixture to be a little soupy but not too much, this may require more or less than half a container depending on the size of your vegetables. Put rice on a plate, spoon the vegetable mixture over top, top with seasoned seafood soy sauce (it doesn't have to be this but it's the one I like the best for this recipe, I also use Bragg but you can use plain soy sauce if you want) and cilantro. Voila you have a completed meal that's incredibly fast and simple. Just a side note I use the astro Balkan style yogurt, you could use any, just make sure it's plain.
Tuesday, January 29, 2013
Positively Peachy Waffles
Everybody loves breakfast for supper. Or at least that's true for me. Either way if you don't like breakfast for supper then just make this for breakfast instead. I made a healthier spelt waffle with peach yogurt on top. If you want to make this recipe without spelt flour and almond milk you can substitute normal milk and white flour straight across without any troubles.
Waffle Recipe:
2 C Spelt Flour
2 tsp Baking Powder
1/2 tsp Salt
2 tbsp Sugar
2 Large Eggs
1/3 C Butter
1 2/3 C Almond Milk
Mix the dry ingredients together. Beat the egg whites until stiff peaks form. Beat the egg yolks, add in the almond milk and melted butter. Combine liquid and dry ingredients. Fold in egg whites then cook in a preheated waffle iron.
For the peach yogurt I took some canned peaches and mixed half a mason jar of peaches with half a large Balkan style yogurt. You can also mix yogurt and raspberries or really any fruit, those two are my favourites though.
Monday, January 28, 2013
Day Number Two
Welcome to day number two of my 30 day blog challenge. Lucky for you my supper was a success and is definitely worth making again. I would like to thank instagrammer, fitmencook for the vegetable inspiration. Tonight's supper was spicy honey mustard chicken drumsticks with a sweet potato hash. As always if you would like to see pictures of the process follow my instagram, stringbeanela.
Spicy Honey Mustard Drumsticks
1/2 C Honey Mustard Sauce
1 - 1 1/2 tsp Crushed Red Chilies
Dash of turmeric and cayenne pepper
4 Chicken Drumsticks
Mix the chilies, turmeric and cayenne pepper into the honey mustard sauce and separate the sauce into two containers, one that is used for raw chicken and the other that is used for cooked chicken. Spread the sauce from on of the bowls over the drumsticks and put the drumsticks onto the bbq to cook. Once cooked brush the drumsticks with sauce from the other bowl (the one for cooked chicken only). If you don't like saucy drumsticks you can skip this step.
Sweet Potato Hash
1/2 a Red Onion Diced
1 Sweet Potato Diced
1 Purple Sweet Potato Diced
2-3 Broccoli Crowns Chopped
Chopped Cilantro
Pepper
Beef Stock
Cumin
2 Tbsp Coconut oil or 1 Tbsp Olive oil
Put the oil in a pan and heat it up a bit, then add in your red onion and cook it until it starts to look softened. Add the diced purple sweet potato and put a lid on the pan, cook it until it starts to turn tender. Put the diced sweet potato into the pan, put the lid back on and allow it to cook until it turns tender. Finally add in the broccoli crowns for about the last 3-5 minutes, I like my broccoli crisp which is why I save it until the end, if you like yours more cooked I would recommend putting it in when you add the sweet potato to the pan. Once everything is all cooked season with pepper, beef stock (I know it sounds weird but it adds really good flavour to hash) and cumin. Top with chopped cilantro and enjoy :). All in all it takes about 20 minutes for the vegetables to cook from start to finish.
Sunday, January 27, 2013
30 Day Challenge
To start my promise off right I am posting my supper tonight along with all the suppers I make for the next 30 days. Tonight's supper was a healthy margherita pizza drizzled with a balsamic reduction.
Margherita Pizza
1 Rye Crispbread
Handful of chopped basil
Grated mozzarella cheese
Tomato Sauce
1 Garlic clove
1/4-1/3 C balsamic vinegar
Recipe:
The rye crispbread I used was round (about as big as a small pizza) and the brand was Leksands. For those of you who might not want this or don't know where to find it I have also made this on rice cakes and small plain ryvita or wasa as well as gluten free pizza crust or there is also the option of following the recipe but using a traditional pizza crust. Out of all of the versions of healthy pizzas (sans wheat flour) I've made this type of crust is by far my favourite. I have found this rye crispbread at Save on Foods and Superstore for those of you who are Canadians this may help. Onto the recipe, I took my one garlic clove and cut it in half then rubbed both of the halves cut side down on the crust. Following that I spread approximately a quarter cup of tomato sauce all over the crust, then topped it with the grated mozzarella cheese approximately 3/4 cup. (I left the amounts of sauce and cheese up to you since everyone likes different amounts so put on however little or much you want these amounts are just how much I like on my pizza) Sprinkle the chopped basil over the top and bake in a 350 degree oven for approximately 10 minutes until the cheese is melted and golden then remove from the oven and drizzle with the balsamic reduction.
Balsamic Reduction
How to make the balsamic reduction, put between 1/4-1/3 cup balsamic vinegar in a pot and put it on medium heat then let it bubble away til it has just begun to thicken then take it off the heat. Make sure to watch the balsamic as it reduces so that it doesn't reduce too much and burn. The balsamic only takes between 3-5 minutes to reduce so make sure to watch it. I always make the balsamic reduction while the pizza is cooking. Also if you are new to reduction I would recommend keeping the heat a bit lower (medium low) and use a larger amount since it allows more leeway but once it starts reducing it will reduce quickly so the best thing to do is to keep an eye on it. Once you've mastered the balsamic reduction you will find yourself putting it on everything since it is sweeter than balsamic vinegar and I find it a very universal flavour. If reducing vinegar seems too daunting to you you can either buy it reduced from the store or just omit it completely from the recipe. Either way you make this pizza it will be amazing since homemade is always better than store bought. If you have any questions feel free to ask and don't forget to check out my instagram, stringbeanela to see a picture of the pizza.
A Late Start to the New Year
Hello... I know it has been awhile, at this point I can't even apologize for not posting anything recently. How about we wipe the slate clean and start over fresh? I figured out why I had such a hard time putting up posts before, it's because it would take me so long to get the pictures onto my computer that I was no longer excited about the recipe. I recently made an investment to rid myself of my archaic dinosaur of a phone and purchase a phone that shall we say brought me up to speed with the rest of the world... Anyway with this phone I have decided that the pictures of my food will go up on instagram so that I don't have to fiddle with importing them and all that jazz and I will just post the recipes on the blog. Et Voila I have solved all my problems since I won't get complaints from the peanut gallery that there is no pictures and I will still be excited enough about the recipe to want to post it. At this point if you're wondering what my instagram is so that you can see the pictures it is, stringbeanela. I will get the pictures up onto the blog as well it just probably won't all happen in one evening. Again I apologize and hopefully this time everyone can get as excited as me about food. :)
Sunday, November 27, 2011
Balistic for Bagels
I was sitting, waiting, wishing
You believed in superstition
Then maybe you'd see the signs


You believed in superstition
Then maybe you'd see the signs
This part of the song has been replaying in my head tonight as I have been waiting to hear what I am supposed to be doing. So I thought what better time then now to give a new recipe to you. I'm awfully sorry if I make no sense tonight I have a really bad headache so I'm hoping to make it through the post without screwing something up. Anyways bagels are what have been tickling my fancy lately... I have been meaning to make them ever since the weather cooled off from the summer so that I could actually rise the dough with the oven and not kill everyone with the heat coming off the oven. Alas I find myself still with no bagels made so I thought if I centered my post around them I might persuade myself to make them this weekend
Homemade Bagels
1 tbsp active dry yeast
1 tbsp sugar
1 3/4 cups water, warm (100-110F)
4 cups bread flour (not all purpose)
1 tbsp salt
1 egg, for egg wash
Preparation:
In a large bowl (or the bowl of a stand mixer) combine yeast, sugar and water. Let stand for 5 minutes, then stir in flour and salt. Mix dough thoroughly until it comes together in a large ball, pulling away from the sides of the bowl. Add an additional tablespoon of flour or water, if needed.
If kneading by hand, turn dough out onto a lightly floured surface and knead until very smooth and elastic, about 10 minutes. If using a stand mixer, knead dough with the dough hook until elastic, about 8 minutes on a low speed. Place dough in a lightly greased bowl, cover with plastic wrap and let rise for 1 hour, or until doubled in size.
Bring a large pot of water to a gentle boil and preheat the oven to 400F.

When dough has risen, turn the dough out onto a very lightly floured surface and divide into 12 equal pieces (first quarters, then thirds). Shape each piece into a tight ball as illustrated below, pinching the corners together at the bottom of the piece of dough. When all the balls are shaped, let the dough rest for 30 minutes covered with a clean dish towel.

Once dough balls have rested, the bagel shape can be formed. Using your fingers, poke a hole through the center of each dough ball. Stretch out the dough into a ring with your fingers and be sure to make the hole a little larger than you want the finished bagel to have, as it will shrink slightly while the bagel is expanding during the baking process. Let bagels rest for about 10 minutes.

Working four at a time, drop the bagels carefully into the boiling water. Boil for 2 minutes on the first side, then flip and boil for an additional minute. Using a slotted spoon or strainer, transfer bagels to a clean towel to drain for a moment, then place on a parchment-lined baking sheet. Repeat process with remaining bagels.
Brush boiled bagels with lightly beaten egg (a pastry or bbq brush is a good tool for this) and bake for 20-24 minutes, until golden brown.
Cool completely on a wire rack.

Enjoy :)
Tuesday, October 25, 2011
Foodie much?
Tonight I don't have a recipe for you, although I do have a ton to put up shortly I just have been too busy to do so. I thought though my blog could use some fresh blood pumping through its veins. I was checking my email this evening when I realized how much of a food nerd I am... When you are on the mailing list of a store that sends out the fall collection of henkles cookware, you know that you have made it to those ranks... Have no fear though since it is fun to be included in such an elite group. Where something as simple as a beautifully crafted knife can get your heart pumping. Getting the henkles fall catalogue for me was as exciting as a fashionista getting her monthly copy of vogue. Anyways enough about my rant if you want to go check out the beauty that I just beheld the link is below;
http://content.yudu.com/
Have a wonderful night or day wherever your timezone may land you and please come back soon and I will hopefully have something new to tantalize your eyes with :)
http://content.yudu.com/
Have a wonderful night or day wherever your timezone may land you and please come back soon and I will hopefully have something new to tantalize your eyes with :)
Sunday, October 2, 2011
Enjoying Endless Summer
What's so great about a nice long Indian summer? The fact that you can enjoy the summer foods for just a little bit longer. My absolute favourite summer meal... Pasta salad. The simplest meal that tastes even better the next day. I have had many pasta salads in my time but I always come back to my sisters take on it. Her secret to success? Pickle juice. That's it that's all just plain and simple pickle juice mixed into ranch dressing. First you make your pasta we prefer bow ties (farfalle) or shells (conchiglie) so that they have lots of texture and edges to trap the dressing and smaller pieces of vegetables. Then we put a whole bunch of cut up vegetables in a bowl, make sure they are cut smaller so there's no complaints from the peanut gallery. Usually our list includes but is not exclusive to grated carrots, cucumber, onions, pickles (the most important part), tomatoes if you're eating it all the same day otherwise they get watery for the next day, snap peas and anything else that looks delicious in your fridge or may be going bad soon. Then put the cooked, drained, rinsed pasta in the bowl and mix in your dressing of ranch with pickle juice over top. The dressing is about the consistency of homemade coleslaw dressing for the right proportion. This is about halfway between the the consistency of the dressing and water somewhere in there. Place it in the fridge to chill. Then the best part! Eating it. If I am going to eat this salad the next day I always make a little bit extra dressing so i pour some over it right before I eat it and it is ahmazhing!

Thursday, September 29, 2011
I'm Thankful for Pumpkin
Every year never fail at Christmas and Thanksgiving you can be guaranteed this pie will accompany our spread. It may possibly be the easiest pie you will ever make requiring nothing more than a blender and a pie plate to make it. If you are weird like me and don't like crust you get the added bonus of a pie that is crustless. For all those bakers out there can you guess yet what recipe I am referring to? Yes it is the Bisquick Impossible Pumpkin Pie recipe. Now that I've talked it up so much I hope it lives up to expectation.
Bisquick Impossible Pumpkin Pie
Ingredients:
3/4 C Granulated Sugar
1/2 C Bisquick
1 (13oz) Can Evaporated Milk
2 Eggs
1 (16oz) Can Pumpkin
1/2 tsp Nutmeg
1 tsp Cinnamon
2 tsp Vanilla
1/4 tsp Cloves
1/4 tsp Ginger
2 Tbsp Butter
Preparation:
Heat oven to 350 degrees Fahrenheit. Combine all ingredients in blender and blend for one minute until smooth. If you don't have blender combine all the ingredients and beat with a hand mixer for two minutes until smooth. Pour into a greased 9-inch pie pan. Bake for 50-55 minutes until a knife inserted in the middle comes out clean.
*if you don't have nutmeg, cinnamon, cloves and ginger you can replace it with pumpkin pie spice.
Friday, August 5, 2011
Tis the Season to be Canning
Ok, not the canning per se of peaches, pears and raspberry jam but just as delicious. This is a marinade that is fantastic on chicken and other meats. The tartness of the lemon is balanced by the cinnamon and adds a certain oomph that isn't found in your typical lemon juice marinade. The only setback to the recipe is it has to season for a month before you can use it so they may not be ready for this barbeque season this year. Trust me though the wait is scrumptiously worth it.
Spiced preserved lemons
Ingredients:
6 Lemons, washed
4 Tbsp kosher salt
2 Cinnamon sticks
1/2 Tsp coriander seeds
1/2 Tsp black peppercorns
2 Bay leaves
1 Tbsp olive oil
Preparation:
- Quarter two lemons, but not all the way through – they should look like open flowers.
- Sprinkle insides of cut lemons with kosher salt and place in a ceramic or glass bowl. Cover with plastic wrap.
- Put a weight over lemons (like a can of tomatoes sitting in a bowl), and leave on counter for two days.
- Pack lemons tightly into jar and add remaining salt, spices and bay leaves. Juice remaining lemons, pour into jar and top with olive oil. Make sure lemon juice totally covers lemons. Refrigerate for at least one month before using to allow flavours to develop. Then store in the fridge and use within one year.
-Enjoy-
Sunday, April 3, 2011
WHAT! A Healthy Cake!
Hello hello hello. I know a lot has changed since I last updated you on my recipe repertoire, I've been given cookbooks and won cookbooks so I truly have no excuse for not sharing delicious recipes with you. Before all this happened though i made a promise to post a recipe and now I am going to follow through on that promise. Sorry it took so long to get to you Sarah but here is the vegetable cake recipe i promised.

Base:
2 Tbsp oil (plus extra for brushing)
4 Large waxy potatoes, sliced
Topping:
1 Tbsp vegetable oil
1 Leek chopped
1 Red pepper diced
1 Green pepper diced
1 Carrot grated
2 tsp chopped fresh parsley
8 oz full fat soft cheese
4 Tbsp grated mature cheese
2 eggs beaten

- For the base heat the oil in a frying pan cook the potato slices until softened and browned. Layer in the bottom of the springform
- For the topping heat the oil in a frying pan add the leeks and cook until softened ~ 3-4 minutes. Add the carrot, peppers and parsley cook until soft ~ 5-7 minutes.
- Beat the eggs and cheese together in a bowl add the cooked vegetable mixture and season with some salt and pepper. Spoon the mixture over the potato layer and cook at 375 for 20-25 minutes until the cake has set.
 -Slice and Enjoy-

Vegetable Cake
The original recipe:
Ingredients:
Base:
2 Tbsp oil (plus extra for brushing)
4 Large waxy potatoes, sliced
Topping:
1 Tbsp vegetable oil
1 Leek chopped
1 Red pepper diced
1 Green pepper diced
1 Carrot grated
2 tsp chopped fresh parsley
8 oz full fat soft cheese
4 Tbsp grated mature cheese
2 eggs beaten

Preparation:
- Brush an 8 inch springform with oil- For the base heat the oil in a frying pan cook the potato slices until softened and browned. Layer in the bottom of the springform
- For the topping heat the oil in a frying pan add the leeks and cook until softened ~ 3-4 minutes. Add the carrot, peppers and parsley cook until soft ~ 5-7 minutes.
- Beat the eggs and cheese together in a bowl add the cooked vegetable mixture and season with some salt and pepper. Spoon the mixture over the potato layer and cook at 375 for 20-25 minutes until the cake has set.
My not so original version:
I removed the whole bottom layer of potatoes because I don't like the taste of fried potatoes. I took out the peppers and added other vegetables like beets and celery and onions because in my eyes they add more flavour to the dish. I also took out the soft cheese just because it isn't something i generally have on hand and replaced it with old white cheddar in my opinion it ends up being the same a bit dryer but that's ok. I also added chilli flakes and hot sauce and some other spices that I can't remember right now. In my eyes this dish is all about your own personal taste buds so whatever tickles your fancy just experiment and make this your own 
Monday, November 15, 2010
Chicken of the Sea
Hello, hello, hello. I have heard through the grape vine that you guys are getting bored of looking at my fennel blog. I decided that finally I should update you on the food that I have been eating as of recent. To begin this story at the beginning you should know that I really don't like fish. Amazingly enough I actually somewhat enjoyed this recipe all things considered. If you are interested you can find this recipe on the bon appetit website. Without further ado I bring the recipe to you.
I am so sorry i forgot to take a picture of this dish as it wasn't my intent to put this recipe up. I will try for next time. :)
Spice Encrusted Salmon With Yogurt Sauce
Ingredients
- 1/2 cup plain yogurt
- 2 tablespoons chopped fresh cilantro
- 3 teaspoons fresh lime juice, divided
- 3 teaspoons olive oil, divided
- 1 teaspoon minced peeled fresh ginger
- 1 garlic clove, pressed
- 1 teaspoon fennel seeds
- 1 teaspoon coriander seeds
- 4 6-ounce salmon fillets with skin
- Lime wedges
Preparation
- Mix yogurt, cilantro, 1 teaspoon lime juice, 1 teaspoon oil, ginger, and garlic in small bowl. Season with salt and pepper. Place fennel seeds and coriander seeds in heavy-duty plastic bag. Using mallet, crush seeds. Sprinkle fillets with salt, pepper, and seeds.
- Heat 2 teaspoons oil in large nonstick skillet over medium-high heat. Add fillets, seed side down. Cook until brown, about 3 minutes. Turn over. Cook until just opaque in center, about 3 minutes. Drizzle with 2 teaspoons lime juice. Place fillets on plates. Top with sauce; serve with lime wedges.
I am so sorry i forgot to take a picture of this dish as it wasn't my intent to put this recipe up. I will try for next time. :)
Friday, October 8, 2010
Uno Problemo

Ok, here is my problem. I bought this fennel/anise bulb at superstore today and I'm not sure what to do with it. In case you're wondering superstore calls this anise and bonappetit calls this fennel, who is right we are not sure. My real problem is not that I don't know what to make with this, it is that I went into a grocery store without a clearly defined list. When I do that I always make impulse buys on things that we don't actually need but I think look cool or might taste good. I went in to superstore to get one thing, evaporated milk for pumpkin pie and came out with swiss chard and a fennel bulb. The swiss chard was because it tastes fantastic and the fennel because I have never used it in cooking before but I think it should taste good. Anyways, I have three recipes that I have to decide between for the fate of this fennel bulb they are; braised fennel, fennel and green beans or pork marinated in fennel. If you want you please leave a comment on what I should do below.
Saturday, October 2, 2010
An Interesting Taste to a Traditional Accompaniment
Hello again world. I got buns on my brain, actually it's more like bread but when I read that line from a Stephanie Plum book today I knew I had to incorporate it into my post. I am so sorry Janet Evanovich, I give you full credit for that line, it suits Lula to a t by the way. I should probably carry on and quit holding you back from today's recipe... I know the suspense is probably killing you. This recipe only came into my repertoire because of the best social teacher I ever had in grade 10. He assigned a project to make a cookbook of the common social studies terms and explain the recipes and certain procedures that would make that recipe describe that word. Anyways the end result of this long and probably boring story to you guys is that I couldn't find a recipe that would fit the word, melting pot. That being said I hit the high road and went to the favourite homework hub of an average teenager, google and found this recipe. Today I give it to you because I think it would accent the curry carrot soup of the previous blog quite nicely. Without further adieu I give you, curried wheat bread.
- Pinch Tumeric
- 1/2 cup Warm water
- 3/4 cup Warm whole milk
- 1 Tbsp Honey
- 2 Tbsp Vegetable oil
- 2 tsp Salt
- 1 cup Whole wheat flour
- 2 - 2 1/4 cups Bread flour
In a large bowl combine the yeast, curry, tumeric, water, milk and honey. Let stand for five minutes, until the mixture is foamy to ensure the yeast is active. Stir in the vegetable oil, salt, whole wheat and bread flour, enough until it pulls nicely away from the sides. Turn the dough onto a floured surface and knead until elastic. Cover and let stand until double its size approx. an hour and a half. Knock the dough back and shape into an oblong loaf. Dust with flour and bake in a 375 degree F oven for 30-35 minutes, or when you knock on the top of the loaf and it sounds hollow.

Curried Wheat Bread
Ingredients
- 1 Tbsp Active dry yeast
- 2 1/2 Tsp Curry Powder- Pinch Tumeric
- 1/2 cup Warm water
- 3/4 cup Warm whole milk
- 1 Tbsp Honey
- 2 Tbsp Vegetable oil
- 2 tsp Salt
- 1 cup Whole wheat flour
- 2 - 2 1/4 cups Bread flour
Preparation
In a large bowl combine the yeast, curry, tumeric, water, milk and honey. Let stand for five minutes, until the mixture is foamy to ensure the yeast is active. Stir in the vegetable oil, salt, whole wheat and bread flour, enough until it pulls nicely away from the sides. Turn the dough onto a floured surface and knead until elastic. Cover and let stand until double its size approx. an hour and a half. Knock the dough back and shape into an oblong loaf. Dust with flour and bake in a 375 degree F oven for 30-35 minutes, or when you knock on the top of the loaf and it sounds hollow.
Subscribe to:
Posts (Atom)